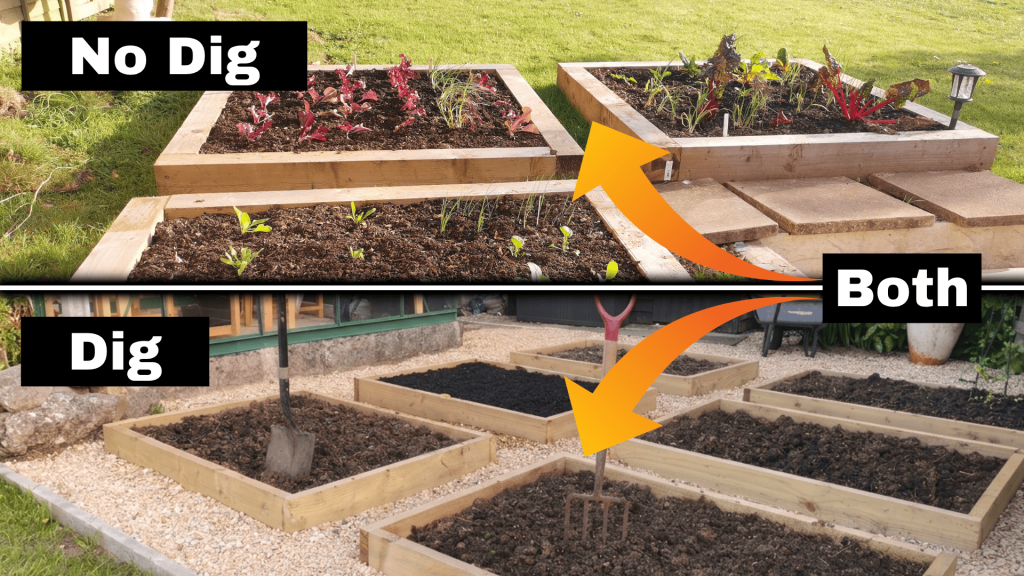
Here’s something that often gets missed in the whole dig vs no dig debate:
You don’t actually have to choose one side and stick to it forever.
A lot of experienced gardeners quietly use a mix of both methods, even if they don’t always say it outright. That’s because real gardens aren’t perfect—and neither is the soil you start with.
Some areas might be compacted. Others might be full of weeds. Some might already be in decent condition. Treating everything the same rarely gives the best results.
A More Realistic Way to Start
If you’re setting up a vegetable garden at home—especially from scratch—the most practical and effective approach is this:
- Dig once where needed to break up poor or compacted soil
- Add plenty of organic matter to improve structure and fertility
- Then switch to a no dig approach moving forward
This isn’t cutting corners—it’s working with your starting point.
Why This Method Works So Well
When you dig once at the beginning, you’re solving the biggest problems straight away:
- Compacted soil gets loosened
- Deep-rooted weeds are removed
- Air and nutrients can reach plant roots more easily
But if you keep digging year after year, you start undoing that progress. You disturb soil life, bring up more weed seeds, and end up stuck in a cycle of constant effort.
By switching to no dig after that initial setup, you allow the soil to stabilise and improve naturally.
Over time:
- Worms do the digging for you
- Organic matter builds up in layers
- Soil becomes easier to work, not harder
What You Gain From This Approach
This hybrid method gives you the advantages of both systems without most of the downsides.
A strong starting point
You’re not trying to grow in poor soil and hoping for the best—you’ve already improved it.
Better soil year after year
Instead of resetting your soil every season, you build on it. Each year gets easier and more productive.
Less physical work long term
After the initial effort, you’re no longer digging beds over and over again.
Fewer weeds to deal with
Once you stop disturbing the soil, you stop triggering new weed growth.
Where This Matters Most
This approach is especially useful if:
- You’re converting lawn into growing space
- You’re working with heavy clay or compacted ground
- You’ve taken over a neglected garden or allotment
- You want results quickly, but also want sustainability
In other words—it’s ideal for most home gardeners.
How to Set Up Your Vegetable Garden at Home (Step-by-Step)
Once you understand the approach, the next step is putting it into practice. This is where a lot of beginners overcomplicate things—but it doesn’t need to be difficult.
1. Choosing the Right Location
This is one of the most important decisions you’ll make, and it’s often underestimated.
Vegetables are energy-hungry plants. Without enough sunlight, they simply won’t perform—no matter how well you prepare the soil.
You’re aiming for:
- At least 6–8 hours of direct sunlight per day
- A position that isn’t heavily shaded by buildings, fences, or trees
- Ground that drains reasonably well (avoid areas where water sits after rain)
It’s also worth thinking practically. If your garden is too far from a water source or tucked away out of sight, you’re less likely to keep on top of it.
A well-positioned garden is easier to manage—and more likely to succeed.
2. Building Raised Beds
Raised beds aren’t essential, but for a home vegetable garden, they make a huge difference.
They give you control. Instead of battling whatever soil you have, you’re creating a defined growing space that you can improve over time.
A simple 1 metre by 1 metre bed works extremely well:
- You can reach the middle from all sides without stepping on the soil
- It keeps everything organised and manageable
- It naturally prevents compaction
You don’t need expensive materials. Timber, sleepers, or even basic frames will do the job. The goal isn’t perfection—it’s structure and ease of use.
3. Preparing Your Soil Properly
This is the foundation of your entire garden—and where your chosen method really comes into play.
If You’re Starting With Dig
If your soil is compacted or poor, digging once can make a big difference.
Take your time with this step:
- Turn the soil over thoroughly
- Break up large clumps
- Remove as many weeds and roots as possible
- Work in compost or well-rotted manure
You’re not just preparing the surface—you’re improving the growing conditions deeper down where roots will develop.
If You’re Starting With No Dig
If you want to avoid digging altogether, you can build directly on top of the existing ground.
The process is simple but powerful:
- Lay down cardboard to block existing weeds (this will break down over time)
- Add a thick layer of compost—around 5–10cm is ideal
- Plant directly into that compost layer
What you’re doing here is creating a new top layer of fertile soil while leaving the structure underneath untouched.
Why This Step Matters So Much
However you do it, this stage sets the tone for everything that follows.
Good soil:
- Holds moisture better
- Provides nutrients consistently
- Supports strong root growth
Cut corners here, and you’ll be fighting problems all season.
4. Choosing the Right Crops
One of the biggest mistakes beginners make is trying to grow everything at once.
It’s far better to start with a small number of reliable crops and get them right.
Some of the easiest and most rewarding options include:
- Potatoes – very forgiving and productive, even in less-than-perfect conditions
- Salad leaves – fast-growing and ideal for regular harvesting
- Courgettes – high yield from a single plant
- Beans – simple to grow and great for vertical space
These crops give you quick wins, and that early success is important. It builds confidence and keeps you motivated to keep going.
5. Maintaining Your Garden
Once everything is planted, the focus shifts from setup to consistency.
This is where good habits make all the difference.
Watering
Water deeply rather than little and often. This encourages roots to grow deeper and makes plants more resilient.
Feeding the soil
Especially if you’re using no dig, continue adding compost each season. Think of it as topping up your soil’s energy.
Keeping an eye on problems early
Pests and issues are much easier to deal with when caught early. A quick check every few days can save entire crops.
You don’t need to be out there constantly—just regularly.
The Biggest Mistake Most Beginners Make
It’s not choosing the wrong method.
It’s not planting the wrong crops.
It’s this:
Ignoring the soil.
Soil isn’t just something plants sit in—it’s what feeds them, supports them, and determines how well they grow.
You can follow every technique perfectly, but if your soil is lacking, your results will always be limited.
On the other hand, when your soil is healthy, everything becomes easier:
- Plants grow stronger
- Watering becomes more effective
- Problems become less frequent
Focus on your soil first, and the rest starts to fall into place.
Final Thoughts
The dig vs no dig debate can make things seem more complicated than they need to be.
The reality is simple:
- Digging is useful when you’re starting out or dealing with poor ground
- No dig is ideal for building long-term soil health and reducing effort
You don’t have to pick a side—you just need to use the right approach at the right time.
If you’re starting a vegetable garden at home:
- Keep things simple
- Focus on improving your soil
- Build a system you can maintain
Because in the end, the best gardening method isn’t the most popular one…
It’s the one you’ll stick with year after year.